Showing posts with label eclipse. Show all posts

Monday, April 11, 2016

Why Does 'Building Workspace' Block Launching Programs?

How often have you imported a large project in Eclipse and then immediately tried to launch it? But instead of going straight to the running program, you are stuck with the "User Operation is Waiting" dialog, because Eclipse is still building the workspace...


If you are a Java or C/C++ developer, this may seem absolutely natural. Of course, the code needs to be compiled before running it. But if your project is implemented in JavaScript or PHP, or in any of the myriad of interpreted languages then it is completely valid to ask yourself: "What the heck is Eclipse building?"

Why does this happen?


The term "building" is an abstraction in Eclipse denoting the process of transforming the available resources in the workspace into some result. Any plugin can contribute builders for processing the workspace's resources. Some of the builders are truly compilers that transform the source code into a binary form. But most of the builders in Eclipse are actually validators that just check the source code for problems and add error and warning markers.

Eclipse started as a Java IDE. The primary reason for introducing the builders in the Eclipse Platform was to compile the Java source code into bytecode that can be executed by the JVM. It was important to ensure that the building process has finished before launching the Java program. Otherwise the launched program may be broken because some classes are still being compiled. Therefore, the launching infrastructure was implemented to block if any builders are still running and to wait for their execution to finish.

While the above makes sense for Java, it does not for many other programming languages that Eclipse supports today. The builders that run for a PHP project, for example, are just to validate the code and are not a prerequisite for its successful execution.

So...

What is the solution?


Fortunately, the behavior of the program launching infrastructure can be configured. There is a preference that determines if the program launch should wait for the build to finish. 


The preference is on the "Run/Debug > Launching" preference page. Look for the group of radio buttons with title "Wait for ongoing build to complete before launching". Usually the default value "Always" is selected, which follows the behavior described so far. Selecting "Never" will switch the waiting for the build off, while "Prompt" will display a dialog asking whether to wait for the build or not. The latter option is useful if your workspace contains programs written in both compiled and interpreted languages.

Tuesday, March 22, 2016

Why Does Canceling Operations in Eclipse Never Work?

Well... saying "never works" is too extreme, so let's say "does not work often enough". Often enough, so the majority of users do not trust the red square button for canceling background operations.

Let's have a look at some quotes from a famous web site for collecting (mostly negative) feedback about Eclipse.
When I cancel a task, it hangs and ends up taking longer than it would have taken to let it finish.
Cancelling never works. Trying to build a project. It get's stuck. I cancel it. It cancels for 10 minutes. I have to force quit it again.
Why in gods name do you have a cancel task option if it's never going to cancel the @#$% task?? Is this some kind of sick joke?
There is also a blog post written back in 2006, which gives a more detailed picture of a user experience with the cancel button.

Why does Eclipse provide a cancel button that does not work?


Let's have a look how the Cancel Operation button is implemented. When you click on the red square button, the Eclipse Platform raises a "cancellation" flag for the running background operation. Then it is up to the latter to check if that flag is raised and terminate itself.

In other words, the Eclipse Platform has no power to terminate background operations, but only to send them a request for cancellation. If the operation is implemented in a proper way, i.e. frequently checks for the cancellation flag, it will promptly terminate itself. Alternatively, a poor implementation may totally miss checking the cancellation flag and finish as if the user has not pushed the cancel button.

In an even worse scenario, the background operation may check for the cancellation flag, but instead of terminating itself immediately, it may try reverting everything it has done so far. While this may be a valid approach for some use cases where keeping data consistency is critical, most of the time it is just an over-engineering. This way an operation that was canceled in the middle of the execution, may take longer than if it has not been canceled at all. This leads to even more frustrating user experience.

What is the solution?


Unfortunately, there is no direct solution for you as a user to apply to your IDE. The issue is caused by a weak code implementation in the plugins providing the background operations and it must be fixed there. There is no magic fix that can be implemented in the Eclipse Platform alone.

However, there is still something you can do:
  1. Report the issue - yes, please open a bug if you stumble upon an operation that does not terminate promptly when you hit the cancel button. This is a good small step to make a difference.
  2. Keep your Eclipse up-to-date with the latest version of all plugins with the hope that this kind of issues will be resolved over time.
If you are an Eclipse plugin developer then you should design carefully your background operation, so users are able to cancel them. It is natural to focus on the happy path when implementing a new operation. But it won't be always the case where users will trigger your operation and will patiently wait for it to finish. Quite often users will realize they've trigger your operation accidentally, or it is taking longer than expected and they don't want to wait for it any longer, or they just want to do something else like saving a file or shutting down the IDE, but your operations is blocking them, or... tons of other reason that may make users want to cancel your operation.

And if users cannot cancel your operation within a few seconds, they will open the Task Manager and will kill the IDE. Which is a lose-lose situation - neither your operation will be completed, nor the user will be happy. So, give the user the chance to win :-)

Code tips on improving the implementation of background operations


The most fundamental thing to make your background operations responsive for cancellation is to check if the cancellation flag has been raised. You should have already been provided with an instance of IProgressMonitor in your operation's implementation, whether it is a Job, a WorkspaceJob, a WorkspaceModifyOperation, etc. Checking for the cancellation flag is simply calling the the monitor's isCanceled() method.

The below code examples check for the cancellation flag and interrupts the operation's workflow by returning the CANCEL_STATUS.
if (monitor.isCanceled()) return Status.CANCEL_STATUS;
Checking for the cancellation flag should be done as often as possible. This check is a cheap operation and there should not be any concerns about the performance. In the end, if you have a long running operation, it is more important for users to cancel it promptly than having it a few milliseconds faster.

Very often long running operations are processing lots of items in a loop. As the list of items may grow unpredictably long, there should be a check for cancellation inside the loop on every iteration. This ensures that the operation can be canceled promptly regardless of the number of items that are processed. See the example below:
while (hasMoreWorkToDo()) {
    // do some work
    // ...
    if (monitor.isCanceled()) return Status.CANCEL_STATUS;
}
return Status.OK_STATUS;
Another common issue with unresponsive background operations is when they execute an external process or a long I/O operation and block on it waiting to finish. Waiting on external processes or I/O operations should no be done indefinitely. You should take advantage of any API that allows waiting for a limited amount of time. This way you can wait just for a short time (e.g. one second), then check if your operation is canceled, and if not, wait again for a short time. Below is an example how to wait for an external process to finish and check if your operation is canceled at the same time.
while (!process.waitFor(1, TimeUnit.SECONDS)) {
    // process is still running
    // check if the operation has been canceled
    if (monitor.isCanceled()) {
        process.destroy();
        return Status.CANCEL_STATUS;
    }
}
Finally, some further readings I highly recommend to every Eclipse plugin developer:

Tuesday, March 15, 2016

Why Does Plugin Installation in Eclipse Take so Long?

How often have you tried installing a new simple plugin in your Eclipse and the installation process gets stuck on "Calculating requirements and dependencies" for ages?


Why does this happen?


Eclipse is an extensible software platform comprised of plugins and each plugin depends on other plugins. The successful installation of a new plugin requires its dependencies to be successfully resolved. The ideal situation is when all required plugins are already installed in your Eclipse, but this is often not the case. Therefore, the dependencies must be fetched from an update site and installed together with the plugin you actually want to install.

In order to resolve the above complex task, the Eclipse install manager (the one you invoke using the Install New Software wizard from the Help main menu) scans all update sites registered in the Eclipse workspace. The scanning process involves reading the update site's metadata and then trying to calculate the best match for the required dependencies.

The problem with getting stuck may happen for a number of reasons: the number of update sites registered in the workspace has grown significantly or there is a networking problem with the user connection, one of the update site's server, a proxy or a VPN connection.

What is the relief?


Scanning all update sites is the default behavior of the Eclipse install manager. Fortunately, it can be changed.

First, if you are still waiting on "Calculating requirements and dependencies" then hit the Stop button on the right side of the progress bar. This will immediately stop the installation process (yes - this is one of the rare cases where this button is implemented properly in Eclipse) and it will make the wizard's user interface responsive again.

Now, simply deselect the "Contact all update sites during install to find required software" checkbox. This way the install manager will look for dependencies only on the update site providing the plugin being installed. None of the other update sites, registered in the workspace, will be contacted. This will significantly improve the time spent on the "Calculating requirements and dependencies" phase and it will reduce the size of the metadata that needs to be downloaded.


There is one drawback of deselecting the checkbox. If the update site providing the plugin being installed is not self-contained, i.e. does not provide all the required dependencies, then the installation will fail with an error message for unresolved dependencies. However, this will be a fast failure and you can go back and select the "Contact all update sites..." checkbox again. In such case, I also recommend to go and review all registered updates sites in the Install/Update > Available Software Sites preference page and disable those that do not seem to be related to the plugin being installed.

My personal experience is that the majority of Eclipse plugins install without any need for scanning additional update sites for the required dependencies. My recommendation is to deselect the "Contact all update sites..." checkbox and select it only if the installation process fails without it.

Is there such an option in the Eclipse Marketplace Client?


It's nice that the Install New Software wizard provides a checkbox that can be deselected, but why can't you find a similar checkbox in the Eclipse Marketplace Client?

Well... because you don't need one. The Eclipse Marketplace Client is a smarter and user-friendlier version of the Install New Software wizard. It implements a fallback strategy - first, it tries to resolve the dependencies by only looking at the update site providing the plugin, and only if that fails it will automatically try contacting all update sites.

Effectively, this is an automated implementation of the recommended manual workflow given above for the Install New Software wizard. In case you are curious about the details regarding the implementation of the fallback strategy, you may have a look at the discussion in bug 316362.

Friday, February 19, 2016

Enable the CSS3 Profile in Eclipse

Eclipse has a rich and powerful CSS editor. It provides the expected features like syntax highlighting, content assist and outline. If you have already tried it and you are already on CSS3, you may have noticed that the content assist misses the new CSS3 properties. It looks like the Eclipse CSS editor has somehow stuck on CSS2. But it is not really. The support for CSS3 is there, but ... guess what ... not enabled by default.

Here is how you can enabled the CSS3 features:
  1. Right-click on a CSS file and call the Properties dialog.
  2. Open the Web Content Settings page.
  3. There you will find a field CSS Profile set to "none".
  4. Change the CSS Profile value to "CSS3: Cascading Style Sheets, level 3".
  5. Click the OK button.

Now, try again the content assist in the CSS editor. It will suggest also the CSS3 properties like "border-radius".


This is how to change the CSS profile per file. It is also possible to change it per project using the same steps on the project's Properties page. But it only works if the project is a Dynamic Web Project or a Static Web Project one. The Web Content Settings page is not available for other project types like PHP projects. It is also not available as a workspace-wide preference. So, for the majority of project types it is only possible to change the CSS profile per file.

The good news is that with Neon M6 the default CSS profile becomes CSS3. See bug 438283. So, the above steps won't be necessary in the near future and users will see the CSS3 features off the shelf.

Wednesday, April 22, 2015

Making the Text Editor to be the Default One for All Unknown Files in Eclipse

NOTE. The functionality of the Default Text Editor plugin has been implemented in the Eclipse Platform with the Neon release. Check the release notes for details.

Eclipse users usually work with many different file types. Some of the file types may be opened by default in an external editor instead of in the Eclipse workbench. This happens if Eclipse has no editor available to handle that particular file type, but there is one installed in the operating system. In such case Eclipse assumes that it is better for the user to have the file opened in the external system editor.

Lots of users are quite annoyed by this behavior, especially when it comes to text-based files. They would prefer to have the file opened in the plain text editor of Eclipse instead of switching the context to the external program. Unfortunately, there is no easy way to change this in the preference settings. It's possible to associate a specific file extension with the plain text editor, but this must be done separately for every file extensions. There is no way to say "all text files of unknown type should open in the text editor".

Here comes the Default Text Editor plugin. It takes advantage of the Editor Association Override extension point introduced in Eclipse 3.8. When the plugin is installed it will change the default behavior of Eclipse and will opened all text files of unknown type in the plain text editor. Binary files like images may still be opened in an external system editor. As simple as that.

The plugin is available on the Eclipse Marketplace. It can also be installed through an update site. More info is available on the GitHub project.

Wednesday, April 1, 2015

$150 Bug Bounty for Fixing a Dark Theme Issue

Zend Studio is an IDE based on the Eclipse Platform. The dark theme is an important feature and is very popular among PHP developers. The most annoying issue with the dark theme, we have at the moment, is that the expand/collapse toggle in trees is almost invisible on Windows, because it seems to be unaffected by the dark theme coloring. See Eclipse bug 434201 for details.


We decided to put some money on the table with the hope that someone will step in and fix this bug. This will benefit not only Zend Studio users, but all Windows users in the Eclipse ecosystem who want to use the dark theme.

We created a $150 bug bounty on the FreedomSponsors crowd-funding platform. Follow this link to open the sponsored issue. Since this is a crowd-funding platform, anyone else who is ready to give some money for resolving this issue is welcome to do it, so the offer becomes more attractive.

UPDATE. The bug has been fixed within days and it will be delivered with the Mars M7 milestone. Thanks to Fabio Zadrozny for his great work. Kudos to Lars Vogel for adding $100 more to the bounty.

Tuesday, August 12, 2014

Highlighting Breakpoints Like in Zend Studio 5.5

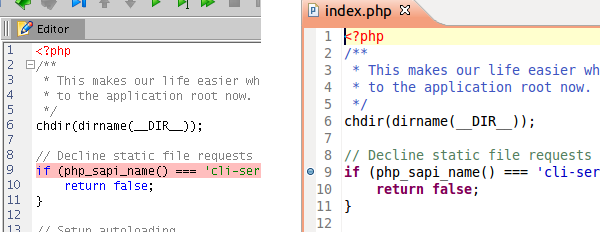
Looking at the feedback we receive, it seems that lots of our long-time users feel nostalgic to the pre-Eclipse era of Zend Studio. Here is one hint how you can bring the look and feel of the latest Zend Studio a little bit closer to the one experienced with the legendary Zend Studio 5.5.

In Zend Studio 5.5 when adding a breakpoint the complete line was highlighted in pink color. In later releases of Zend Studio this was replaced by the usual way of the Eclipse Platform - a blue bullet appears in the marker area on the left side of the editor's line.


Luckily, this can be configured in the same way it was in Zend Studio 5.5, following these steps:

  1. Call Window > Preferences from the main menu.
  2. Navigate to the General > Editors > Text Editors > Annotations preference page.
  3. Select "Breakpoints" in the list of annotation types.
  4. Select the "Text as" checkbox.
  5. Select "Highlighted" from the drop-down list.
  6. Change the color to #FFC0CB.
  7. (Optional) If you want to remove the blue bullet then deselect the "Vertical ruler" checkbox.
  8. Click the OK button.

Note. You need to upgrade to the latest Zend Studio 11.0.1 Early Access build or wait for the official 11.0.1 release (due in a week) to take advantage of this hint. There was a bug in the PHP editor that prevented breakpoint highlighting in previous releases.

Tuesday, July 8, 2014

Coding Like a Pro

When switching to an Eclipse-based IDE like Zend Studio, some developers become annoyed by the help they are provided in the code editors. Auto closing of braces, parentheses, tags and the like is helpful for beginners and advanced developers who got used to this feature. But for those migrating from tools where they used to have the full control in the editor, this is nothing but a hurdle.

Fortunately, you can switch this off. As you may guess it is hidden in the ocean of preferences. The easiest way to find it is to enter "typing" in the filter field of the Preferences dialog.


As you can see on the above image this filtering gives you the necessary pages where you need to go and deselect the desired checkboxes for the PHP editor, the JavaScript editor and so on in order to customize your typing experience in the IDE.

Saturday, December 21, 2013

Eclipse for PHP Developers is Back

After a few years pause the Eclipse for PHP Developers package is back with the Luna M4 milestone of the Eclipse Simultaneous Release.

The package assembles the PHP Development Tools (PDT), the JavaScript Development Tools (JSDT), HTML, CSS and XML editors, and productivity tools like EGit and Mylyn. It is one of the easiest way to start using PDT for developing PHP applications.

The package can be downloaded from the Developer Builds section on the Eclipse Downloads page: http://eclipse.org/downloads/index-developer.php

Friday, August 9, 2013

Comparing feature.xml Files With XMLUnit

Recently, I worked on a releng tool that compares two build results of an Eclipse-based product and reports the differences. Depending on how the build is modelled, there are metadata files, which content changes with each build, e.g. version timestamps in feature.xml. In order to avoid polluting the report with such changes, I wanted to filter them.

So, I needed a way to compare feature.xml files, but yet ignoring differences found in some xml attributes like "version", "download-size" and "install-size". Luckily, I stumbled upon XMLUnit, which saved me lots of efforts.

XMLUnit was designed as a helper for asserting test results for code that produces XML output. But it's also turns to be a great helper for any use case that involves comparison of XML data.

Comparing two XML files is as easy as creating a new Diff object and calling any of the two test methods: identical() and similar(). In my case, similar() worked better.

The above snippet compares the XML files, but it does not ignore the attributes I am not interested of. Customizing the comparison mechanism of XMLUnit is very easy by overriding the so called DifferenceListener with own implementation.

In my own implementation I simply check if the found difference is related to any of the three attributes I want to ignore. If this is the case then I simply tell XMLUnit to treat these difference as "similar".

And this is everything you need to get the job done.

Monday, July 15, 2013

Moving Forward

After more than 12 years working for SAP, it was time for a change. I decided to refresh my professional life and joined the Zend Studio team.

All these years at SAP will remain a cornerstone in my professional career. I built myself as a software engineering. I worked on exciting projects together with so many great colleagues in the lab in Sofia, in the headquarters in Walldorf, and across the globe. I engaged with the Eclipse open source community.

My participation in the Eclipse community was perhaps the most romantic part during that time. I am extremely happy that in my new job I will continue being part and contributing to the community.

After two months working for Zend Technologies, I can say that this was the right move for me. I am now having the environment I wished for some time: smaller company, less processes, less politics, faster decision making, ROWE, telecommuting, shared office space, using modern and friendlier tools... In short: more freedom.

Thursday, October 25, 2012

Committer Access to Eclipse.org Git Repositories behind a Proxy

There are lots of Eclipse committers that are employed by corporations and spend their day in an office protected with strong security measures. In other words they work behind a corporate proxy and have not direct access to Internet, which makes it hard using some network protocols on their usual ports, like SSH on port 22.

These committers have three alternatives for committer access to git.eclipse.org:
  1. Find a pubic WiFi or 3G network and temporarily switch to it. This is not always possible: requires WiFi / 3G adapter and available network, and not really convenient: requires to switch network adapters and proxy settings. 
  2. Request the Eclipse webmasters to provide HTTPS access to the respective Git repository. HTTPS works very well behind corporate proxies. Unfortunately it is not enabled by default for Eclipse.org Git repositories and the webmasters have their security concerns for doing this. 
  3. Try the good old proxy.eclipse.org as we know it from the CVS Howto guide. If it worked for you for accessing the CVS repositories then it should work also for the Git repositories. This is a nice workaround - it tunnels the SSH protocol from proxy.eclipse.org:443 to git.eclipse.org:22. If the configuration of your corporate proxy is not absolutely paranoic then you should be able to take advantage of this option. Here is an example screenshot of EGit configured to clone the Eclipse Libra website repository:

Happy gitting!


Monday, August 27, 2012

Changing the Context Root of Web Applications

This article was originally posted in the SAP Community Network. I post it here with few changes that generalize it for all Eclipse WTP users.

Soon after the first steps in developing web applications with Eclipse WTP, developers often realize that the default context root of their applications is not exactly what they want. By default, the context root goes after the project name - if the name of your project is "HelloWorld" then it will be deployed with context root "/HelloWorld".

Changing the context root is a piece of cake. In this post we will see how you can do this in Eclipse WTP.

Setting the context root when creating a new web project

As described in the Web Tools Platform User Guide, when creating a new web application, you typically use the "New Dynamic Web Project" wizard. Instead of finishing it on the first wizard page, you should click on the Next button to advance to the "Web Module" wizard page. There you can set the context root of the application by modifying the value in the "Context root" text field. If you wish to deploy the application in the server's root then simply give "/" as context root.


Changing the context root of an existing web project

To change the context root of a web application that is already available in the Eclipse workspace, simply right-click on the web project and call the "Properties" action from the context menu. Then navigate to the "Web Project Settings" property page and you will find the text field where you can change the context root.


Depending on the server adapter you use, if your application is already deployed and started then you may need to redeploy it or restart it for the change to take effect. 

Wednesday, August 15, 2012

STS 3.0 and SAP NetWeaver Cloud

This article was originally posted in the SAP Community Network

One of the interesting news this week is the release of the Spring Tool Suite 3.0.0. In addition to the new features, the highlight is that the complete project is now available as open source software on GitHub under the Eclipse Public License. This is really great news for the Eclipse community! More details about this move can be found on the SpringSource Blog.

After reading this news, I was thrilled to try developing a Spring application with STS 3.0 and deploying it on my trial account in SAP NetWeaver Cloud. I went to the STS download site, grabbed a package and installed it. Then I followed the usual steps for installing the Eclipse Tools for SAP NetWeaver Cloud on top of STS. Since STS 3.0 is based on Eclipse 4.2, the Eclipse Tools for SAP NetWeaver Cloud must be installed from the Juno update site: https://tools.netweaver.ondemand.com/juno.


STS comes with a nice dashboard that brings you up to speed with the Spring technology. Luckily there is a nice example project "spring-mvc-showcase" that demonstrates the capabilities of the Spring MVC web framework through small, simple examples. Just a single click and the project was fetched from GitHub and installed in my Eclipse workspace.


The Maven Integration for Eclipse resolved all required libraries and the project was ready to deploy. I quickly got a functional Spring application, so I will skip any real Spring development for now.

Deploying it on the SAP NetWeaver Cloud required a few more clicks. I just called the "Run on Server" action from the project's context menu and deployed it successfully on the Local Test Server and on my trial account in SAP NetWeaver Cloud.


Trying out Spring with SAP NetWeaver Cloud was a really easy win for me!

Friday, July 6, 2012

Eclipse UI Tips now come on time


The first version of the Eclipse UI Tips for Android reached the astonishing adoption of 18 installations. 13 of which are still active. I am happy that there are people who find this app interesting and useful. Special thanks go to Lothar who submitted the only review in Google Play. I really appreciate it! And I really do care for the feedback that reaches me. 

A few days ago I published an update of the application. As requested, the time for the tip of the day is now configurable. It is not fixed to 8:30 am anymore and you can set it to whatever time you like.

Another improvement is that the welcome screen now includes a link to the User Interface Guidelines wiki page. This is a short term response to the request that it should be possible to browse all of the guidelines without waiting for the tip of the day to come. I will work on a more integrated solution later.

The new version includes also some minor improvements in the layout and a couple of bug fixes.

That's for now, folks! If you want to share any feedback, you are warmly welcome to write a review in Google Play or submit an issue in github.

Monday, June 25, 2012

Eclipse UI Tips for Android

As an Eclipse plug-in developer I am always looking for guidelines how to design my UI for the best user experience. Although not updated for quite a long time, the User Interface Guidelines wiki page is the best source of information I am familiar with. It's quite a lot of reading (big thanks to the contributors), but the time spent on reading really worth.

Recently, I counted that there are exactly 144 guidelines described. Quite a lot, isn't it? Of course, there is a short list of the most important 18 guidelines, but this doesn't mean that I should neglect the other 126. Therefore, I was looking for an easy way to remember them all.

It's quite modern now-a-days to use a smartphone for making one's life easier. I created a simple Android app that fires a status bar notification every morning with a randomly selected Eclipse UI guideline. This would remind me one of these guidelines every day. Since they are 144 total, this should keep me busy for nearly half a year and then for sure I would need to do another round :)

I published the application to Google Play, so you can try it yourself if you find this idea useful. The code is available as open source under EPL on github.

Android app on Google Play

Please, note that I have designed the application to fit my own needs. It's very likely that you have a different style of learning. I am open for feedback, request for improvements and patches. You are welcome to fork the project and submit your requests in the issue tracking system of github.

Sunday, October 23, 2011

Bundle Dependency Graph moved from Virgo to Libra

Those of you who are familiar with the Virgo Tooling know about the rich tools in the Virgo server editor. It consists of editor parts like:
  • The Bundle Repository that allow easy installation of bundles from the SpringSource EBR into the OSGi framework.
  • The Bundle Overview that lists all bundles installed in the OSGi framework with their states, attributes, imported and exported packages and services, etc.
  • The Bundle Dependency Graph that visualizes the dependencies between the bundles as a graph.
  • The Server Console that allows executing shell commands in the OSGi framework (somewhat duplicating the standard Eclipse Console). 

The good news today is that three of these editor parts - Bundle Overview, Bundle Dependency Graph and Server Console - are now released from their Virgo dependencies and moved to the Libra project, which allows using these tools with any OSGi framework as well as integrating them in adopter's server adapters for OSGi-based application servers.

This move has been done in the timeframe of Juno M3 that will be officially released on November 11, 2011. From this date on, this new Libra feature will be able to be installed from the Juno Discovery Site. Until then, those who are eager to try it out now, can do this from the Libra Nightly repository.


The new feature is called "OSGi Framework Editor". However, if you want to try it with the Libra server adapters for the open-source OSGi frameworks (like Equinox, Felix, etc.) you will need to install also the "OSGi Framework Launchers" feature. Watch these great video tutorials for an introduction to these server adapters.

The Bundle Overview and the Bundle Dependency Graph editor parts retrieve the bundle information from the OSGi framework via JMX. Therefore, make sure you configure JMX correctly by following the user guide.

In case you like these tools and you want to integrate them in your own server adapter, then take a look at the comprehensive adopter guide that explains how to do this.

So, that's all folks for Juno M3. I plan making some enhancements for the next Juno milestones. My hope is that these editor parts become a useful tool for analyzing the state and the dependencies of  OSGi bundles.


Friday, September 9, 2011

Sharing Target Platforms and Launch Configurations in Version Control

Last week I had the pleasure to participate in the Masterclass on OSGi led by Neil Bartlett and Peter Kriens. The event was really fruitful and inspiring, and among other things I had to opportunity to work with Bndtools. For a long-year user of Eclipse PDE like me, it was quite interesting to look at the OSGi bundle development from such a different perspective.


One of the differentiators of Bndtools is that all resources of the OSGi development environment (like bundle repository, build and run configurations) are stored in projects in the Eclipse workspace and can be easily shared to a version control system using the Eclipse Team Provider. And indeed, this is a very useful feature - sharing such non-functional resources with your team members would enable them to quickly have the same working environment by just a quick checkout from the version control system.

But... Does Eclipse PDE really miss this same feature?

Not exactly! PDE has the "target platform" that is the equivalent of the bundle repository and the build-time configuration in Bndtools, and the "launch configuration" that is the equivalent for the run configuration in Bndtools. It's true that both target platforms and launch configurations are stored deep in the Eclipse workspace's metadata, which cannot be shared using the Eclipse Team Provider. But this is just the default behavior. Both artifacts can be exported to files in existing projects in the workspace so they can be shared.

Target Platforms

Let's first take a look at the target platforms. Users have two options: 1) create a new target platform from scratch as a file, or 2) export an existing target platform to a file.

New target platforms can be created using the New Target Definition wizard. It can be found by following New > Other... > Plug-in Development > Target Definition from the main menu. You need to choose "Nothing" for "Initialize the target definition with". The result is an "empty" .target file in an existing project in the workspace.


Exporting an existing target platform to a file can be done in a similar way. In the New Target Definition wizard choose the "Current Target" radio button instead of "Nothing". This way the wizard will export the active target platform. If you want to export a target platform that is not the active one at the moment, you need to first activate it (from Window > Preferences > Plug-in Development > Target Platform preference page).

Edit (Thank Curtis for this hint): Another (even easier) way to export an existing target platform is by going to the Target Platform preference page (Window > Preferences > Plug-in Development > Target Platform) and using the Share... button. This will launch a wizard that will export the selected target platform as a .target file in the specified project. The wizard itself will not share the target platform in a version control system, but after having it in the project you can use the Eclipse Team Provider for doing this.

The result .target file can be open and edited with the (default) Target Editor. It is important to mention that there may be many target definitions in the workspace, but only one can be activated as a target platform at the same time. This is a known issue (bug 159072) in PDE. It's not a problem for simple OSGi development scenarios, but could be really annoying for more complex ones. I have to admit that Bndtools has a better design here - every Bnd project can have its own target platform equivalent.

Launch Configurations

Here the only option is to export an existing launch configuration. This can be done by calling the File > Export... > Run/Debug > Launch Configurations wizard from the main menu. The selected launch configuration will be exported as a .launch file at the given location on the file system. You need to browse the location of the respective project in the workspace. Don't forget to Refresh the project to see the exported file.


The .launch files can be executed by using the Run As actions in the context menu. They can be edited by calling Run As > Run Configurations... action. Actually, every .launch file in the workspace is recognized as a launch configuration.

Like target platforms, you can have many launch configurations in the workspace. And, luckily, you can launch as many as you like at the same time. Launch configurations can be configured to launch only a subset of the target platform - the bundles that you really want to run, plus additional bundles from the workspace. So, it's worth having several launch configurations if complex projects must be run in different contexts.

Additional Hints

It's very important to remember that when sharing resources with a team provider you should avoid using absolute file paths. Otherwise, your team mates could see broken paths if they don't maintain the same directory structure like yours. Such file paths could be the working directory of a launch configuration or a directory of bundles included in a target platform.

The Eclipse Platform has an excellent solution called Path Variables. The one that I like the most is the ${workspace_loc} variable that always points to the root location of the current Eclipse workspace. I highly recommend using it when constructing file paths that will be shared with a team provider.

Many dialogs in Eclipse provide the special Workspace... button that makes construction of paths relative to the workspace root very easy.


Conclusion

We've seen that sharing project metadata like target platforms and launch configurations, although not so obvious at first sight, is easily possible in Eclipse PDE. Compared to Bndtools, PDE even provides some more flexibility, but at the same time has also some deficiencies.
Languagesen>bg GoogleCE
за

Friday, April 30, 2010

How to Setup an Eclipse Update Site on SourceForge

I needed to setup a project for Eclipse plug-ins at SourceForge.net. Like many other similar projects I'd like to deliver my releases via an Eclipse update site instead of ZIP downloads. My goal was to take the best of the SourceForge's file release system and mirror site infrastructure.

After a short googling I found out that this problem has a simple solution. Thanks to Michiel 'elmuerte' Hendriks for posting guidelines on his blog. They work like a charm.