Friday, February 19, 2016

Enable the CSS3 Profile in Eclipse

Eclipse has a rich and powerful CSS editor. It provides the expected features like syntax highlighting, content assist and outline. If you have already tried it and you are already on CSS3, you may have noticed that the content assist misses the new CSS3 properties. It looks like the Eclipse CSS editor has somehow stuck on CSS2. But it is not really. The support for CSS3 is there, but ... guess what ... not enabled by default.

Here is how you can enabled the CSS3 features:
  1. Right-click on a CSS file and call the Properties dialog.
  2. Open the Web Content Settings page.
  3. There you will find a field CSS Profile set to "none".
  4. Change the CSS Profile value to "CSS3: Cascading Style Sheets, level 3".
  5. Click the OK button.

Now, try again the content assist in the CSS editor. It will suggest also the CSS3 properties like "border-radius".


This is how to change the CSS profile per file. It is also possible to change it per project using the same steps on the project's Properties page. But it only works if the project is a Dynamic Web Project or a Static Web Project one. The Web Content Settings page is not available for other project types like PHP projects. It is also not available as a workspace-wide preference. So, for the majority of project types it is only possible to change the CSS profile per file.

The good news is that with Neon M6 the default CSS profile becomes CSS3. See bug 438283. So, the above steps won't be necessary in the near future and users will see the CSS3 features off the shelf.

Wednesday, April 22, 2015

Making the Text Editor to be the Default One for All Unknown Files in Eclipse

NOTE. The functionality of the Default Text Editor plugin has been implemented in the Eclipse Platform with the Neon release. Check the release notes for details.

Eclipse users usually work with many different file types. Some of the file types may be opened by default in an external editor instead of in the Eclipse workbench. This happens if Eclipse has no editor available to handle that particular file type, but there is one installed in the operating system. In such case Eclipse assumes that it is better for the user to have the file opened in the external system editor.

Lots of users are quite annoyed by this behavior, especially when it comes to text-based files. They would prefer to have the file opened in the plain text editor of Eclipse instead of switching the context to the external program. Unfortunately, there is no easy way to change this in the preference settings. It's possible to associate a specific file extension with the plain text editor, but this must be done separately for every file extensions. There is no way to say "all text files of unknown type should open in the text editor".

Here comes the Default Text Editor plugin. It takes advantage of the Editor Association Override extension point introduced in Eclipse 3.8. When the plugin is installed it will change the default behavior of Eclipse and will opened all text files of unknown type in the plain text editor. Binary files like images may still be opened in an external system editor. As simple as that.

The plugin is available on the Eclipse Marketplace. It can also be installed through an update site. More info is available on the GitHub project.

Wednesday, April 1, 2015

$150 Bug Bounty for Fixing a Dark Theme Issue

Zend Studio is an IDE based on the Eclipse Platform. The dark theme is an important feature and is very popular among PHP developers. The most annoying issue with the dark theme, we have at the moment, is that the expand/collapse toggle in trees is almost invisible on Windows, because it seems to be unaffected by the dark theme coloring. See Eclipse bug 434201 for details.


We decided to put some money on the table with the hope that someone will step in and fix this bug. This will benefit not only Zend Studio users, but all Windows users in the Eclipse ecosystem who want to use the dark theme.

We created a $150 bug bounty on the FreedomSponsors crowd-funding platform. Follow this link to open the sponsored issue. Since this is a crowd-funding platform, anyone else who is ready to give some money for resolving this issue is welcome to do it, so the offer becomes more attractive.

UPDATE. The bug has been fixed within days and it will be delivered with the Mars M7 milestone. Thanks to Fabio Zadrozny for his great work. Kudos to Lars Vogel for adding $100 more to the bounty.

Tuesday, August 12, 2014

Highlighting Breakpoints Like in Zend Studio 5.5

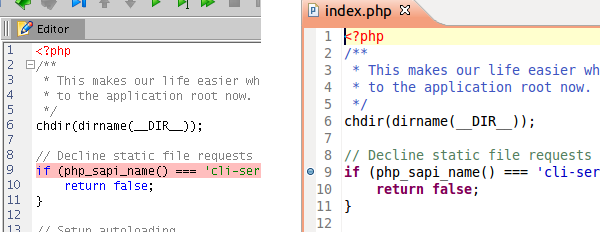
Looking at the feedback we receive, it seems that lots of our long-time users feel nostalgic to the pre-Eclipse era of Zend Studio. Here is one hint how you can bring the look and feel of the latest Zend Studio a little bit closer to the one experienced with the legendary Zend Studio 5.5.

In Zend Studio 5.5 when adding a breakpoint the complete line was highlighted in pink color. In later releases of Zend Studio this was replaced by the usual way of the Eclipse Platform - a blue bullet appears in the marker area on the left side of the editor's line.


Luckily, this can be configured in the same way it was in Zend Studio 5.5, following these steps:

  1. Call Window > Preferences from the main menu.
  2. Navigate to the General > Editors > Text Editors > Annotations preference page.
  3. Select "Breakpoints" in the list of annotation types.
  4. Select the "Text as" checkbox.
  5. Select "Highlighted" from the drop-down list.
  6. Change the color to #FFC0CB.
  7. (Optional) If you want to remove the blue bullet then deselect the "Vertical ruler" checkbox.
  8. Click the OK button.

Note. You need to upgrade to the latest Zend Studio 11.0.1 Early Access build or wait for the official 11.0.1 release (due in a week) to take advantage of this hint. There was a bug in the PHP editor that prevented breakpoint highlighting in previous releases.

Tuesday, July 8, 2014

Coding Like a Pro

When switching to an Eclipse-based IDE like Zend Studio, some developers become annoyed by the help they are provided in the code editors. Auto closing of braces, parentheses, tags and the like is helpful for beginners and advanced developers who got used to this feature. But for those migrating from tools where they used to have the full control in the editor, this is nothing but a hurdle.

Fortunately, you can switch this off. As you may guess it is hidden in the ocean of preferences. The easiest way to find it is to enter "typing" in the filter field of the Preferences dialog.


As you can see on the above image this filtering gives you the necessary pages where you need to go and deselect the desired checkboxes for the PHP editor, the JavaScript editor and so on in order to customize your typing experience in the IDE.

Saturday, December 21, 2013

Eclipse for PHP Developers is Back

After a few years pause the Eclipse for PHP Developers package is back with the Luna M4 milestone of the Eclipse Simultaneous Release.

The package assembles the PHP Development Tools (PDT), the JavaScript Development Tools (JSDT), HTML, CSS and XML editors, and productivity tools like EGit and Mylyn. It is one of the easiest way to start using PDT for developing PHP applications.

The package can be downloaded from the Developer Builds section on the Eclipse Downloads page: http://eclipse.org/downloads/index-developer.php

Friday, August 9, 2013

Comparing feature.xml Files With XMLUnit

Recently, I worked on a releng tool that compares two build results of an Eclipse-based product and reports the differences. Depending on how the build is modelled, there are metadata files, which content changes with each build, e.g. version timestamps in feature.xml. In order to avoid polluting the report with such changes, I wanted to filter them.

So, I needed a way to compare feature.xml files, but yet ignoring differences found in some xml attributes like "version", "download-size" and "install-size". Luckily, I stumbled upon XMLUnit, which saved me lots of efforts.

XMLUnit was designed as a helper for asserting test results for code that produces XML output. But it's also turns to be a great helper for any use case that involves comparison of XML data.

Comparing two XML files is as easy as creating a new Diff object and calling any of the two test methods: identical() and similar(). In my case, similar() worked better.

The above snippet compares the XML files, but it does not ignore the attributes I am not interested of. Customizing the comparison mechanism of XMLUnit is very easy by overriding the so called DifferenceListener with own implementation.

In my own implementation I simply check if the found difference is related to any of the three attributes I want to ignore. If this is the case then I simply tell XMLUnit to treat these difference as "similar".

And this is everything you need to get the job done.